
Jump-Start To Exposure
The Exposure Triangle is something that every photographer and filmmaker “knows” but only a few truly understand. There are tons of so-called cinematographers and filmmakers who somehow can’t seem to film a balanced image. Their camera settings are all off the charts and not in a good way! I’ve seen it first hand, in class, on set, and in film festivals. If you want to better your skills and truly understand exposure read this entire guide. It will change the way you think about filmmaking.
Why I Made This Guide
Being only a director in film school gives the connotation that you are technically un-savvy. I know many directors who have a strong vision but have no clue how to put that vision to screen. I am pointing this out because I used to be one of these clueless directors and I hated it. I hated not knowing how to light a scene, work a camera, and most importantly accurately detail my vision to my crew. I am not hating on directors. I am hating on being in the dark when it comes to the basics of film production. After learning the film basics (as detailed in this blog post), whether I am a director or a cinematographer, I am in the know. Now, I have an indescribable passion for shaping light. I know that not everyone has the time or money to go to film school, I am fortunate to have gone that route. But everybody who is serious about improving their cinematography and filmmaking skills has the time to read what could be the most enlightening blog post for any beginner, intermediate, or confused filmmaker. This is my gift to you and I hope you are able to use this information to shoot with intention and make a kick-ass, properly exposed film.
HERE IS WHAT YOU WILL LEARN:
ISO
How Does ISO Affect the Image?
ISO and Noise
What is Native ISO?
Measuring: ISO and Brightness
ISO vs ASA
What Do You Say?
Shutter Speed
What is Shutter Speed?
How Does Shutter Speed Affect Your Image?
Measuring: Shutter Speed and Brightness
What is Shutter Angle?
What is an Electronic Shutter?
Aperture
What is the Aperture?
What is a F-Stop?
How to Read the F-Stop Scale?
How Does a F-Stop Affect the Image?
F-Stops and Depth of Field
The Exposure Triangle
The Sunny 16 Rule
THE “FILMMAKER’S VAULT”
Get exclusive access to
free filmmaking education and resources
ISO
What is ISO?
ISO is a unit of measurement that gauges the applied gain to the digital sensor. An easier way to look at it is ISO measures how sensitive film stock or a digital sensor is to light. The ISO rating, sensitivity or speed, are all terms to describe ISO values. The higher the sensitivity the brighter the image will appear. Film at ISO 100 has a much lower sensitivity to light than film at ISO 800. Although we are talking in terms of film stock, digital sensors act in the same way and the two terms can be used interchangeably for the uses in this blog post. The main difference between the two is that digital sensors are able to fluidly change their ISO rating in camera, while film stock is rated at one ISO rating at a time. If you want to change the ISO of film stock you need to buy more film with that specific rating.

How does ISO affect the Image?
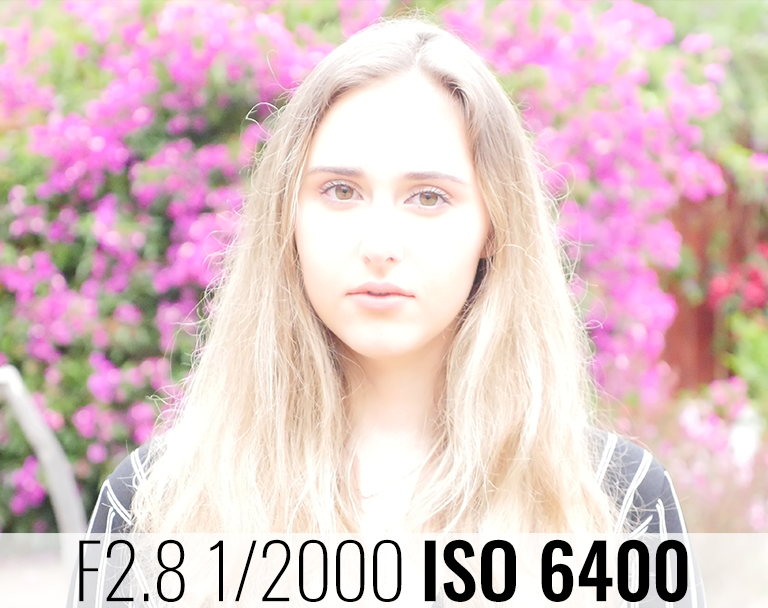
There are pros and cons for each ISO level. A pro is that using a higher ISO rating will allow the amount of light to appear brighter since the sensor is more sensitive. This makes all the lights you are using seem more powerful on camera than they really are. This is especially wonderful in low light situations when light is scarce.
The con is that the higher the ISO the more noise will appear and plague your image. Noise is easier to see in low light situations. A common problem is deciding whether or not to change the ISO setting to render more light, or remove some noise.
ISO and Noise
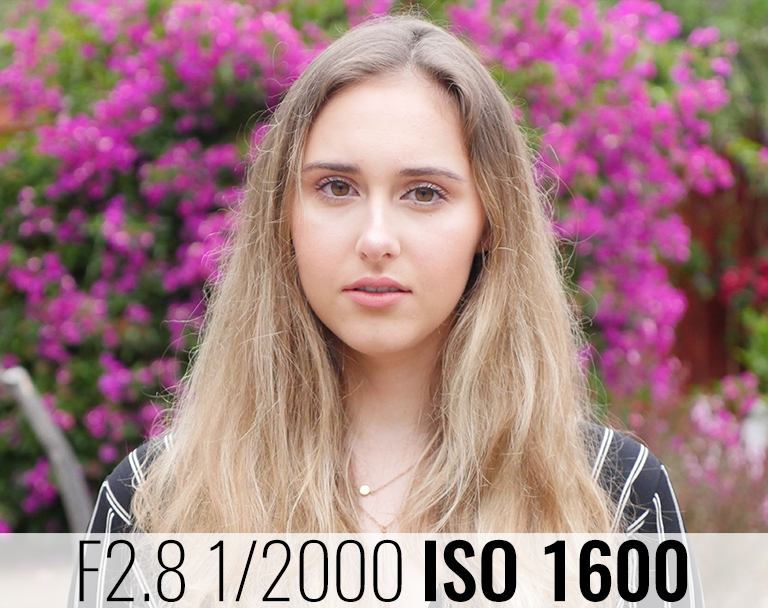
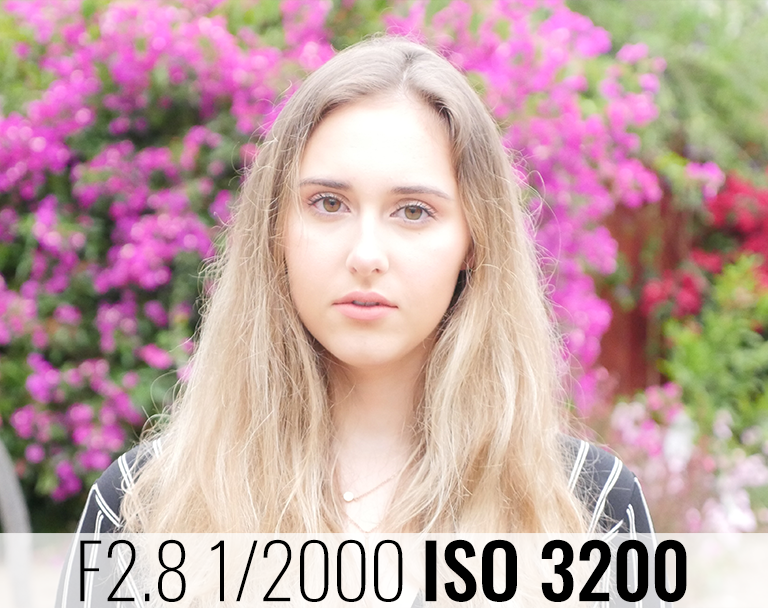
Noise is the grainy digital side effect that stems from too much ISO and/or not enough light. When using a digital camera it is refereed to as digital noise. It first appears in the blacks of the image but will spread to the entire image if it is severely underexposed. Noise is present in many images but it is not a problem until it is distracting and there is so much of it that your image starts to degrade. To remove noise from your image avoid using extremely high ISO ratings like ISO 6400, ISO 3200, and sometimes ISO 1600. Another way to reduce noise is to increase the amount of light in the image until the image is no longer underexposed. There are some programs that remove noise in post production that work well most of the time but it is best to solve this problem on set and in camera if possible.
Noise also occurs in film stock. The higher the rating of film the more noise. Film noise can be more forgiving than digital noise as it sometimes was used as an artistic effect so the filmmaker was able to get away with grainy images. Digital noise is too God-awful to be labeled “artistic.”
What is Native ISO?
Native ISO is the film speed your camera works best at. This is because it is the value where the camera doesn’t have to add gain to the sensor. Remember, digital sensors have the capability to change their ISO values instantly. This is made possible by adding additional gain to the sensor to boost the sensitivity of the pixels and therefore registering more light in the image. This process is where noise comes from. Film stock has a similar process, boosting photons rather than boosting pixels. The native ISO for a lot of cameras is ISO 800 but this will change depending on the make and model. For example, if our native ISO is 800 any rating above or below will be adding noise into your image. ISO ratings above the native are labeled as an amplified ISO. Ratings below the native are labeled as a simulated ISO.
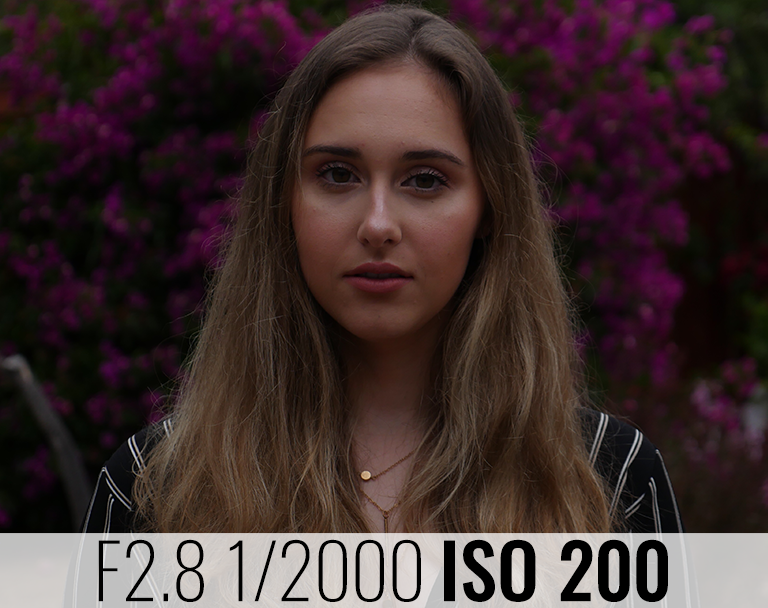
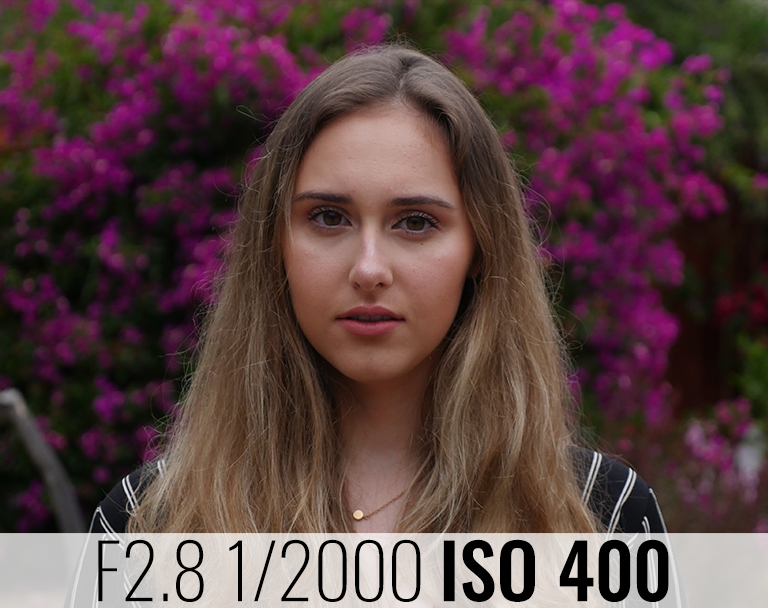
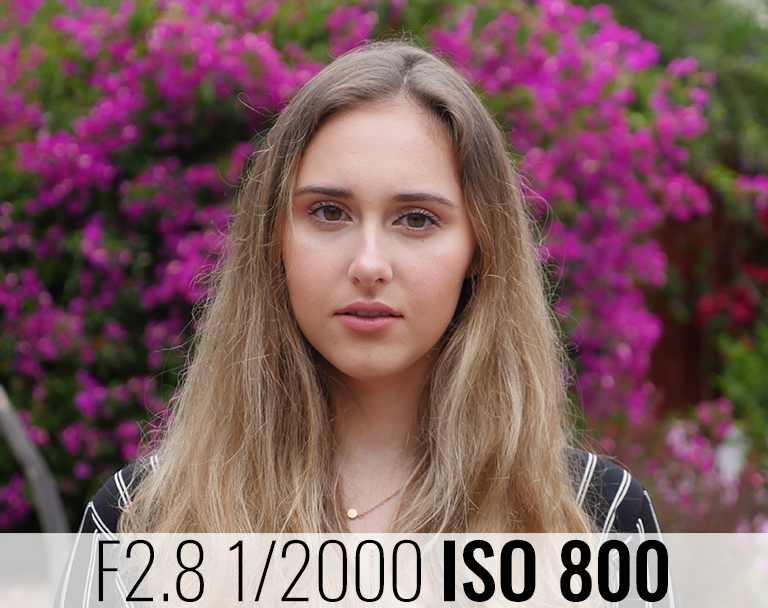
Based on the information above, the native ISO is always the best value to use when shooting, period. But most of us don’t work in a fully controlled environment where we can dial in every setting to our heart’s desire. There are times when you will have to change your ISO value and it is not the end of the world. For many cameras, especially ones with high quality sensors, ISO 1600 is perfectly fine. As a rule of thumb, lower is far better than higher. During the day, the sun is so bright that in order to have any sort of a shallow depth of field, without using ND, you may need to lower the ISO. As you can see below the photo taken at ISO 200 (two stops below the native) has a relatively clean image, while the photo taken at ISO 3200 (two stops above the native) is starting to produce smudgy, grainy noise.


Measuring: ISO and Brightness
The change in brightness by manipulating ISO is measured in stops. A stop, also known as a f-stop, is a term used to measure the change in brightness in ISO, aperture, and shutter speed (we will talk about that in great detail later). For now, remember that one stop equals “two times” (2x) the original value. A stop up would mean “two times greater,” while a stop down is “two times lesser.” Below is a list of the most common ISO ratings:
LIST OF ISO RATINGS:
ISO: 100, 200, 400, 800, 1600, 3200, 6400
To figure out the relationship between the different ISO ratings remember this phrase, “twice the number is twice the light.” So ISO 200 is twice as bright as ISO 100, which means that ISO 200 is one stop brighter than ISO 100. ISO 400 is four times as bright as ISO 100, which means ISO 400 is two stops brighter than ISO 100. There are ISO ratings in between those ratings listed above but they are less commonly used. The gallery below visualizes the differences in brightness using ISO.
ISO vs ASA
ISO is the most common way to rate film and has overtaken ASA as the leading term when talking about film sensitivity. If you ever are in a situation where film is rated as ASA don’t panic. ISO and ASA have the same final measurements and can be used interchangeably. ISO 100 equals ASA 100 and so on.
What do you say? “Eye-so” or “Eye-ess-oh”
How do you pronounce ISO? I’ve been taught to say it as an acronym, saying the three letters independently, “eye-ess-oh.” As I was searching the web recently, wondering what ISO stood for I came across multiple sources stating that I have been pronouncing ISO wrong this entire time.
They argue that ISO is not an acronym and even though it is always capitalized it doesn’t stand for anything. They pronounce ISO as “eye-so,” a two syllable word instead of three.” If you look it up you will find that many sources on the internet say that ISO stands for the International Standards Organization, which is incorrect because the company is actually called the International Organization for Standardization. So why is it ISO instead of IOS?
According to the International Organization for Standardization’s website, their brand name “ISO” is short for the greek word “isos”, meaning “equal”. Therefore, ISO is not an acronym but a short hand version of isos. Now the “eye-so” pronunciation makes more sense, but I wasn’t totally convinced. I double checked all of their sources and it was all credible. Then I looked up how to pronounce isos in traditional greek and is it pronounced “ee-sos” not “eye-sos." So, I guess they are using the American pronunciation of a greek word.
Whatever the correct pronunciation, everyone I have ever come into contact with pronounces ISO like “eye-ess-oh.” I think it came from pronouncing ASA as an acronym and once the switch to ISO happened it was assumed it was pronounced the same way. It is such a strong habit that even if it is wrong, old habits die hard. On my last visit through the depths on online forums there was a statement from the company explaining that they don’t prefer a specific pronunciation. So if the company doesn’t care then we shouldn’t get too heated about this. But now I’m curious. How do you pronounce ISO?
Shutter Speed
What is Shutter Speed?
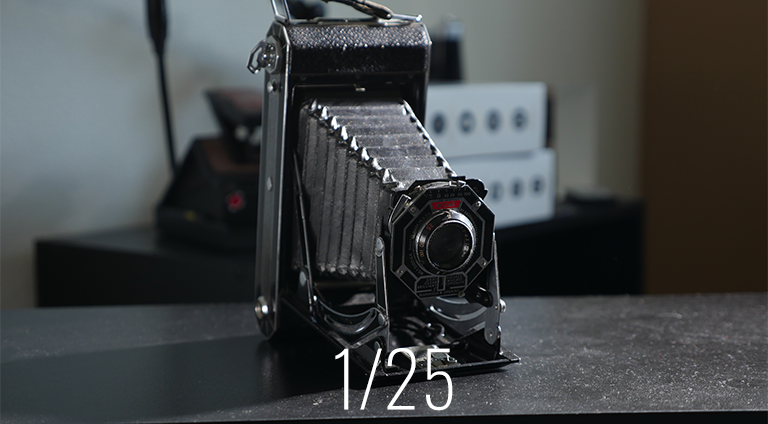
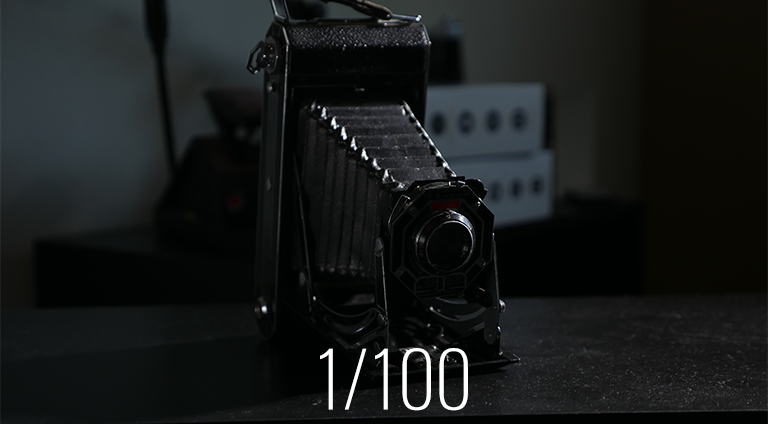
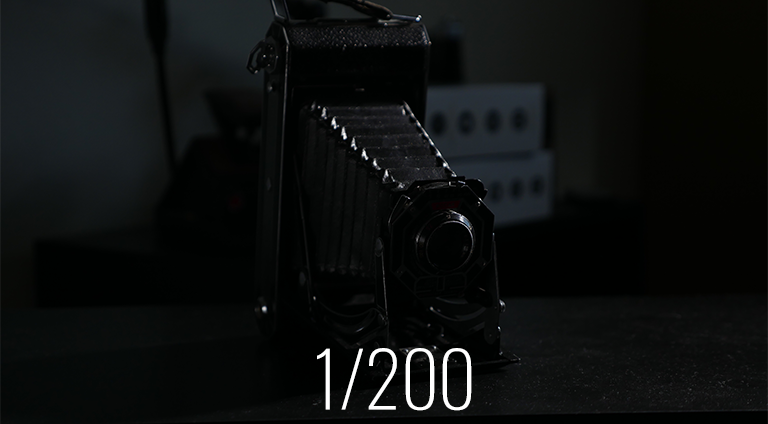
Before we discuss shutter speed let me quickly define a shutter. A shutter is a “curtain” in front of the camera sensor that opens and closes to expose the image. The button in photography that activates the shutter is also called the “shutter” or “shutter button.” Shutter speed is the specific amount of time it takes for the shutter to open and close determining the amount of time the film or digital sensor will be exposed to light. When talking about shutter speed we are almost always discussing fractions of a second. Some cameras show shutter speed as a whole number instead of a fraction. For example, a shutter speed of one hundred can be shown as 100 or 1/100. Either way it means that the time it takes for the shutter to open and close is one one-hundredth of a second. By changing the shutter speed to a larger fraction, like 1/50, the shutter will slow down and allow more light to pass through to expose the film or digital sensor. If the shutter speed changes to a smaller fraction, like 1/750, the shutter will speed up and allow less light to be able to pass through to expose the film or digital sensor.
How does Shutter Speed Affect Your Image?
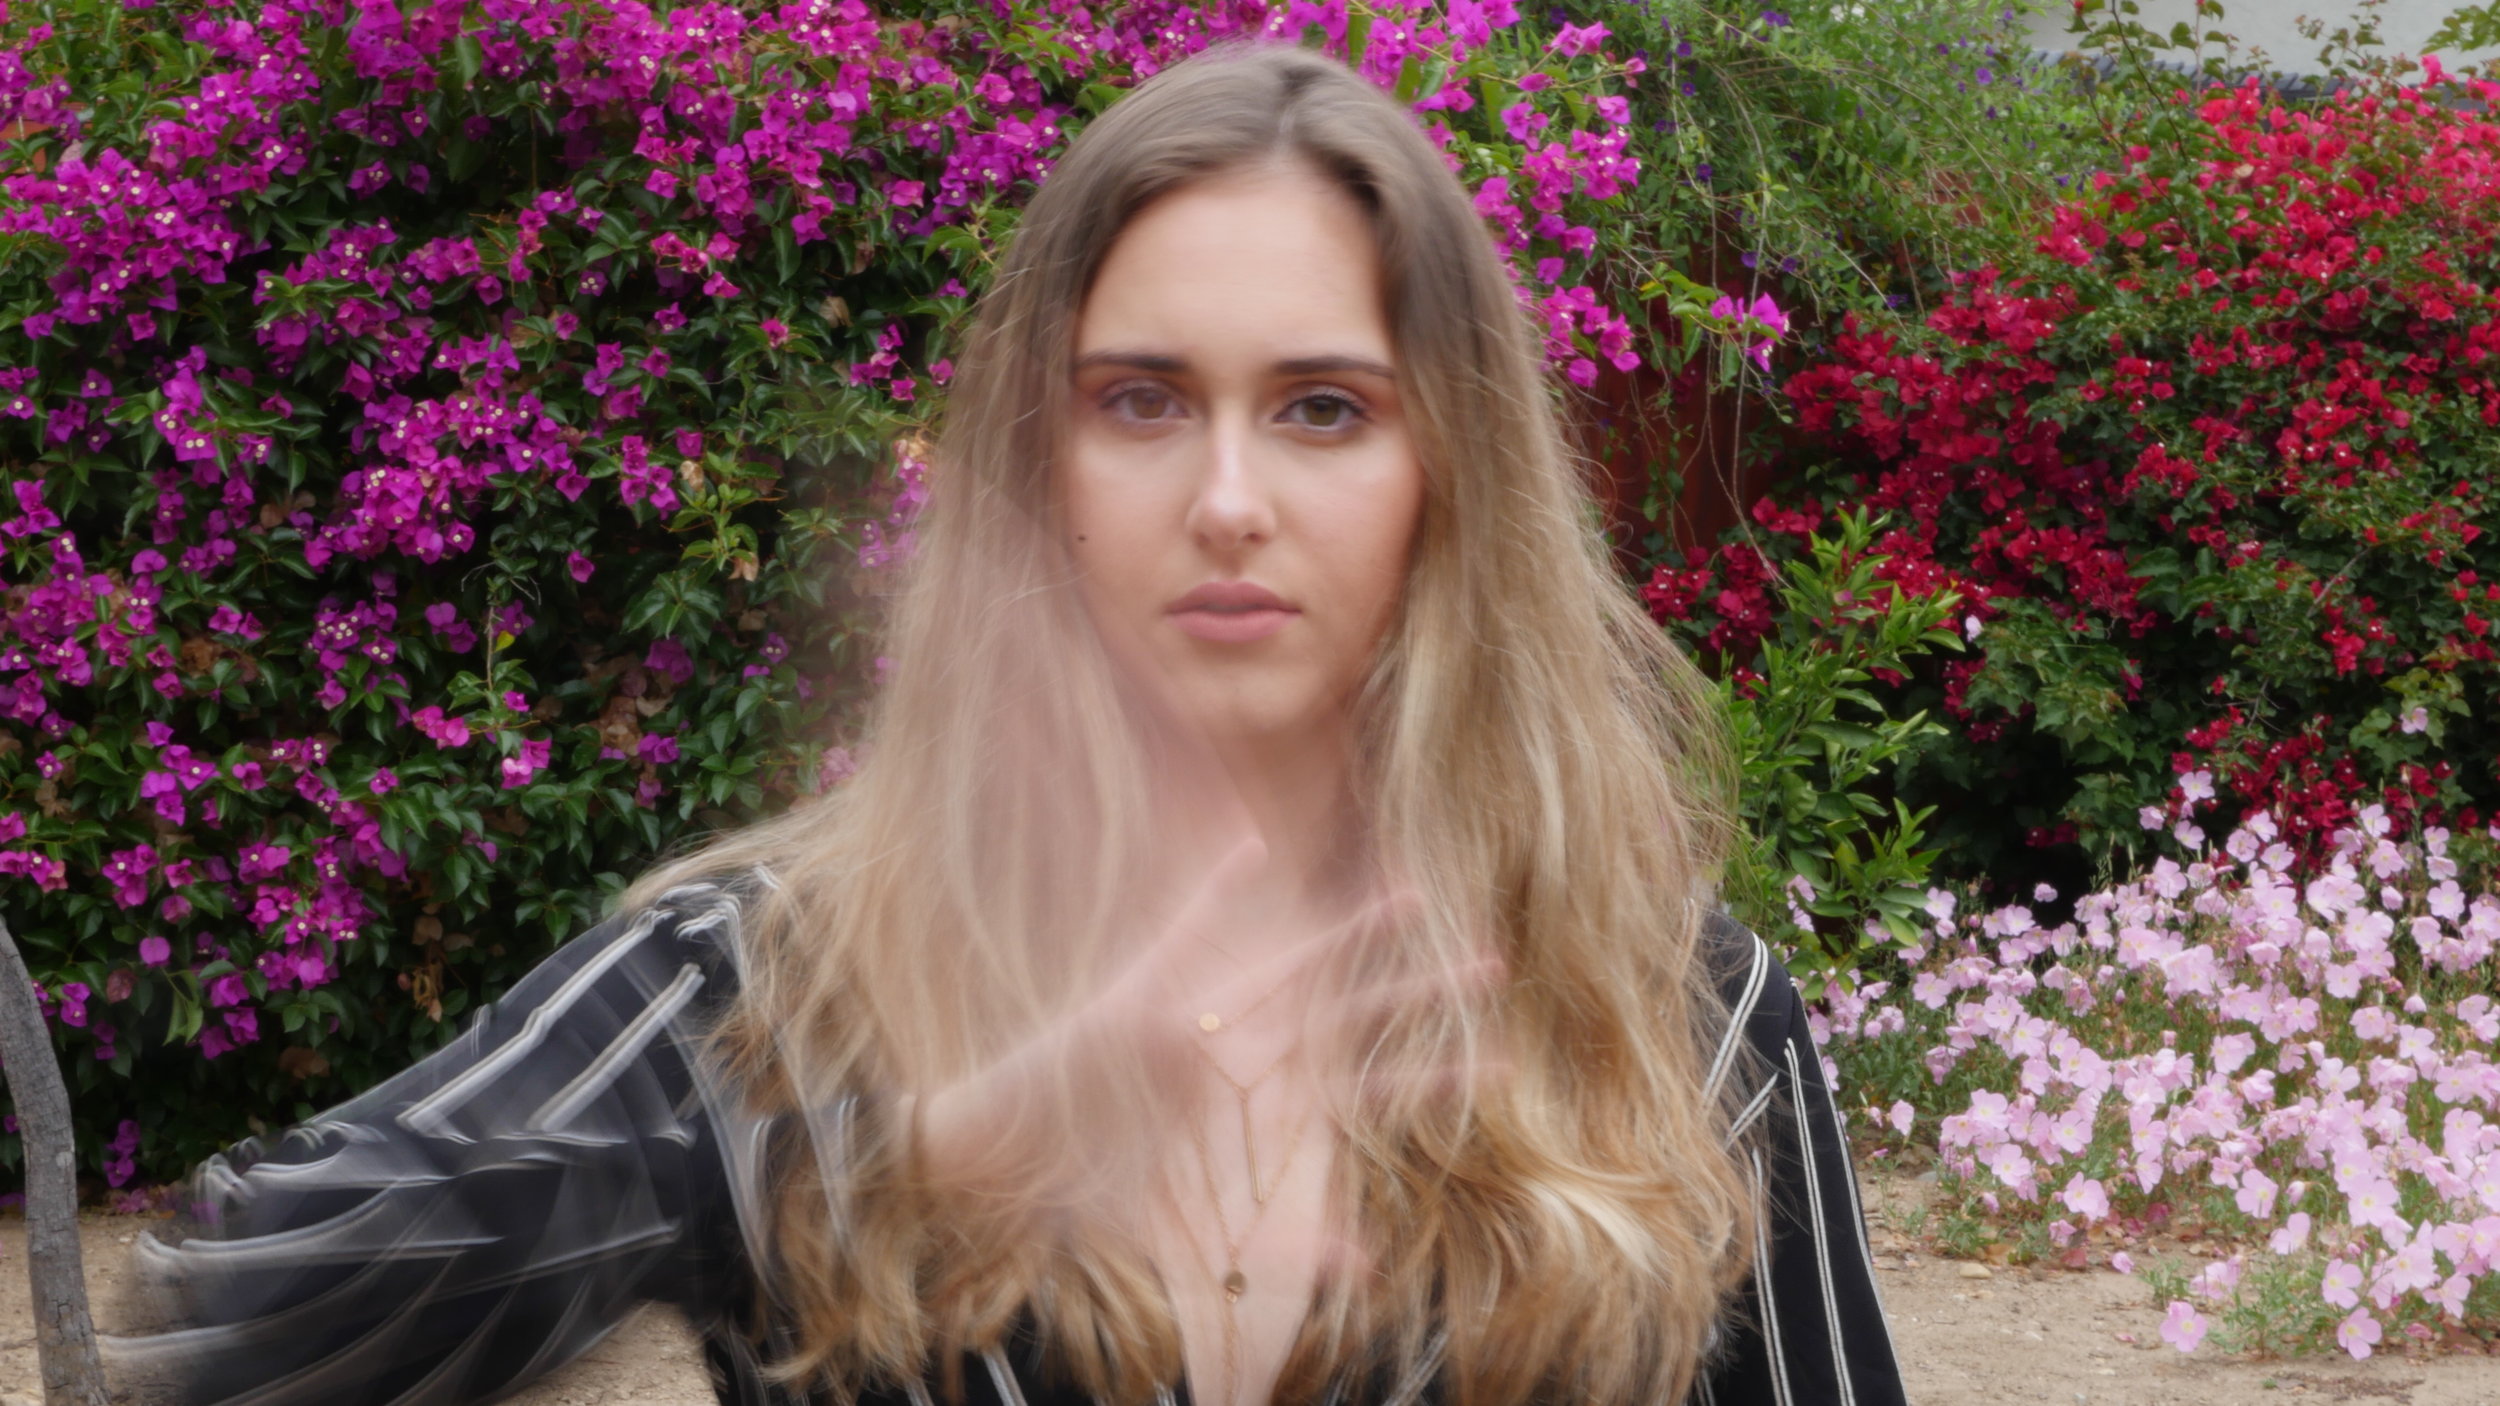
Along with controlling the amount of light that exposes the image the shutter speed also determines how motion is rendered. A fast shutter speed like 1/1000 will have sharp motion. This means that there will be very little to no motion blur. A slow shutter speed like 1/15 will have a lot of motion blur. A small movement like waving your hand will create a streak of motion across the frame. When taking photos, shutter speed can be used to its full potential to create artistic effects, but when taking video it’s best to film at natural motion.
Natural motion is when the motion captured by the camera mimics the natural amount of motion blur that the human eye perceives. The way to set your camera to have natural motion is to set the shutter speed at two times (2x) the frame rate. Frame rate is the number of frames per second that are exposed by light to create a motion picture. The most common frame rates are 24p (24 frames per second), 60p (60 frames per second), and 120p (120 frames per second). The natural motion settings for the respective frame rates are 24p 1/48, 60p 1/120, 120p 1/240. These are the default base settings when taking video.
Measuring: Shutter Speed and Brightness
Shutter speed can also be measured using stops and uses the same rule as ISO, “twice the number is twice the light.” The difference is that shutter speed is measured as a fraction and therefore doubling the number results in a number with a lower denominator. A shutter speed of 1/50 is twice as bright as 1/100, which means 1/50 is one stop brighter than 1/100. 1/50 is four times as bright as 1/200, which means 1/50 is two stops brighter than 1/200.

What is Shutter Angle?
Shutter angle is a different way to communicate shutter speed by using a degree value instead of a specific fraction. When I first introduced the concept of a shutter I described it as a curtain. Although that is still correct when talking about still photography, when talking about video the shutter acts differently. Let’s say we are filming a movie at 24p. The shutter is not going to open and close 24 times each second in order to expose a belt of film as it enters the camera. That is not practical. Instead, think of the shutter as a revolving semi-circle. One side of the circle is closed and will block light, while the other side is open and lets light pass through. Instead of the curtain shutter opening and closing, the semi-circle shutter rotates, passing over the film blocking and unblocking light during every revolution. As film passes through the camera this semi-circle makes one revolution over each frame exposing each frame of film to create a motion picture. To express this type of shutter speed in video we would use a degree value. In this example, the shutter speed would equal 180° because the shutter is the size of a semi-circle, which is half of 360° — a full circle. This type of shutter is called a Rotary Disk shutter.
Since shutter angle is now a degree value instead of a fraction, its value changes automatically depending on the frame rate. Since a 180° shutter angle equals natural motion, it will continue to equal natural motion no matter what frame rate is being used. Here are some examples: 24p 180° = 24p 1/48, 60p 180° = 60p 1/120, 120p 180° = 120p 1/240.
Changing the degree value changes the shutter speed. A smaller degree value equals a faster shutter, while a larger degree value equals a slower shutter. A good way to remember is to visualize the shutter angle as the degree value that is open and exposing the image. 45° is small therefore the shutter speed would be fast. 288° is large and the shutter speed would be slow. Here are the numbers when filming at 24p:
45° angle = 1/198 speed
72° angle = 1/120 speed
90° angle = 1/96 speed
144° angle = 1/60 speed
180° angle = 1/48 speed (Natural Motion)
288° angle = 1/30 speed
360° angle = 1/24 speed (not possible with film stock @24 fps)
The equation to convert shutter speed to shutter angle is: (Frame Rate X 360)/Speed
The equation to convert shutter angle to shutter speed is: (Frame Rate X 360)/Angle
What is an Electronic Shutter?
Throughout this section I have been explaining mechanical shutters. In photography, it is the curtain that opens and closes to expose an image and in video it is a semi-circle that completes revolutions to expose an image. If you have noticed, some DSLR cameras have a mechanical shutter when taking photos but not when taking video. Digital cinema cameras do NOT have a mechanical shutter at all! Instead, these cameras are using an electronic shutter. The sensors are digitally exposing the image and then stopping and starting again to expose the next image. The same concept and theory of the shutter is still applied because the electronic shutter is built to mimic the process of the old mechanical system, but instead of a physical element controlling the shutter speed there is digital software controlling the exposure of pixels.
Aperture
What is the Aperture?
The aperture is the hole in the lens that controls the amount of light that passes through to the sensor. The mechanism that is making that hole is called the iris. A bigger hole in the lens allows more light to pass through and a smaller hole allows less light to pass through and hit the sensor. The amount of light that passes through the lens is measured in stops. Also called f-stops.


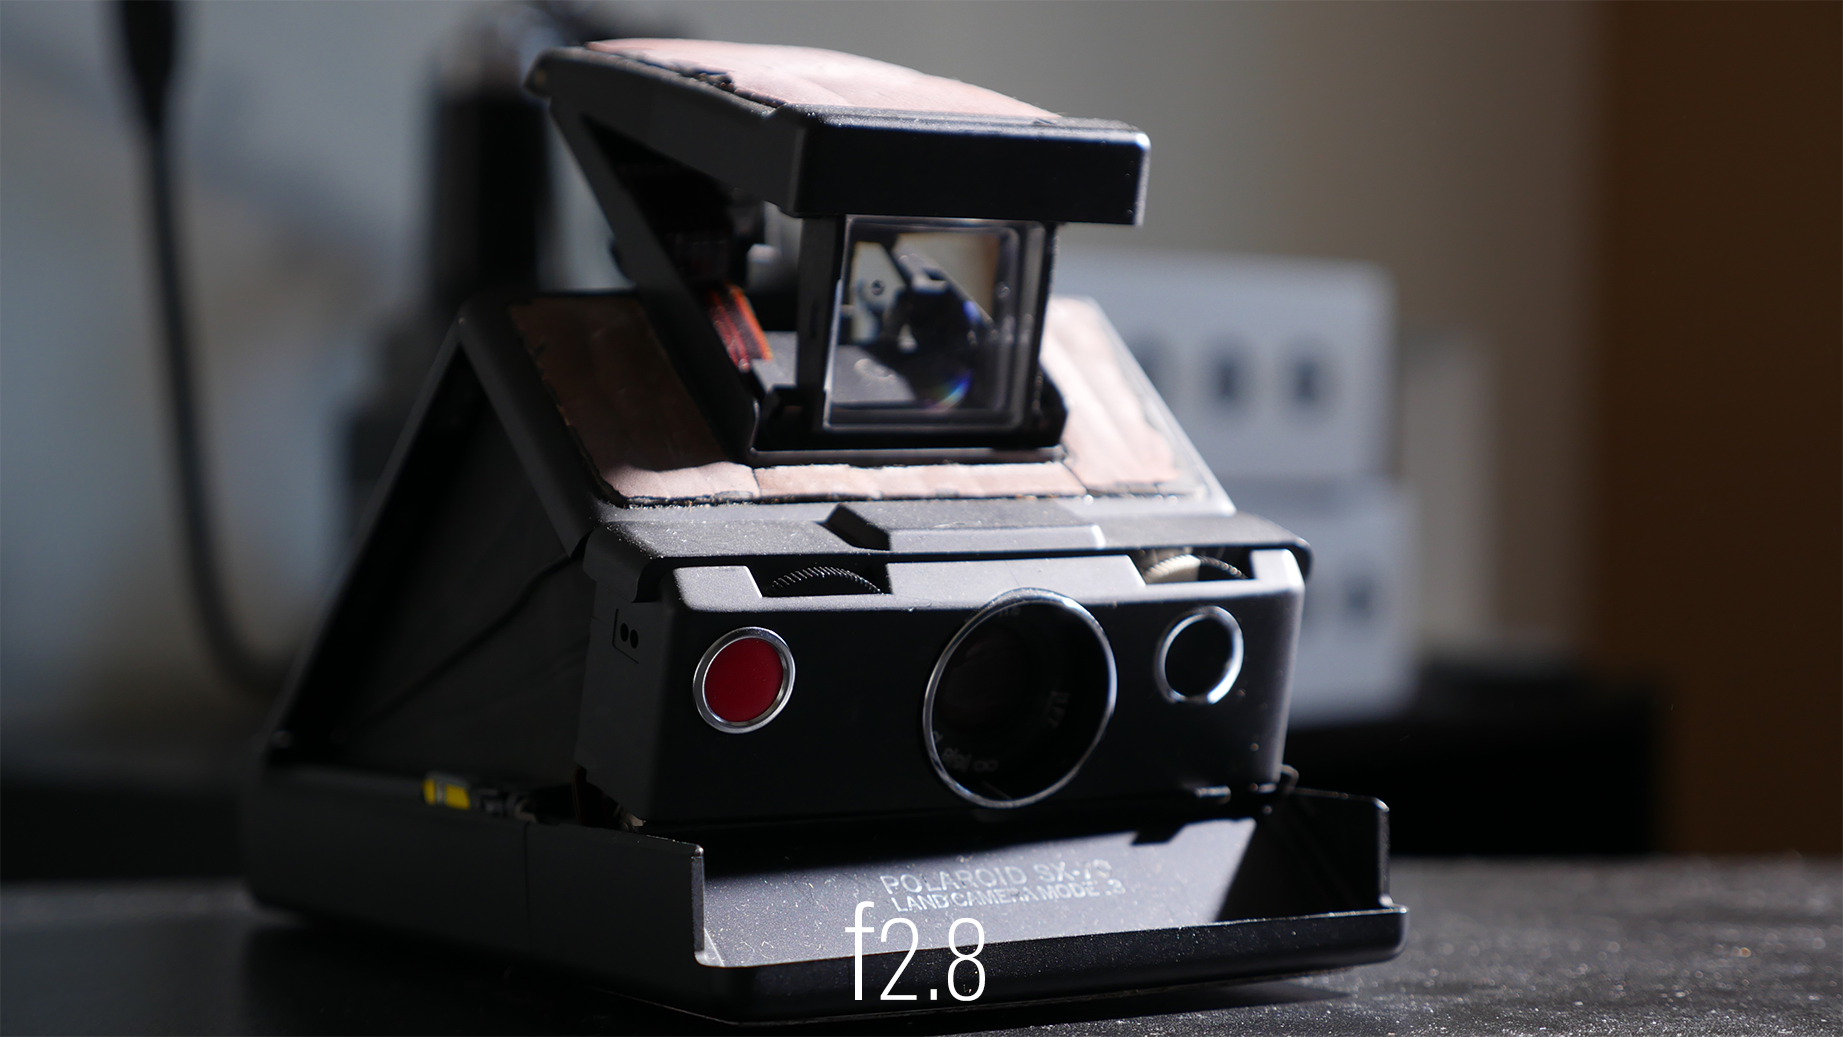
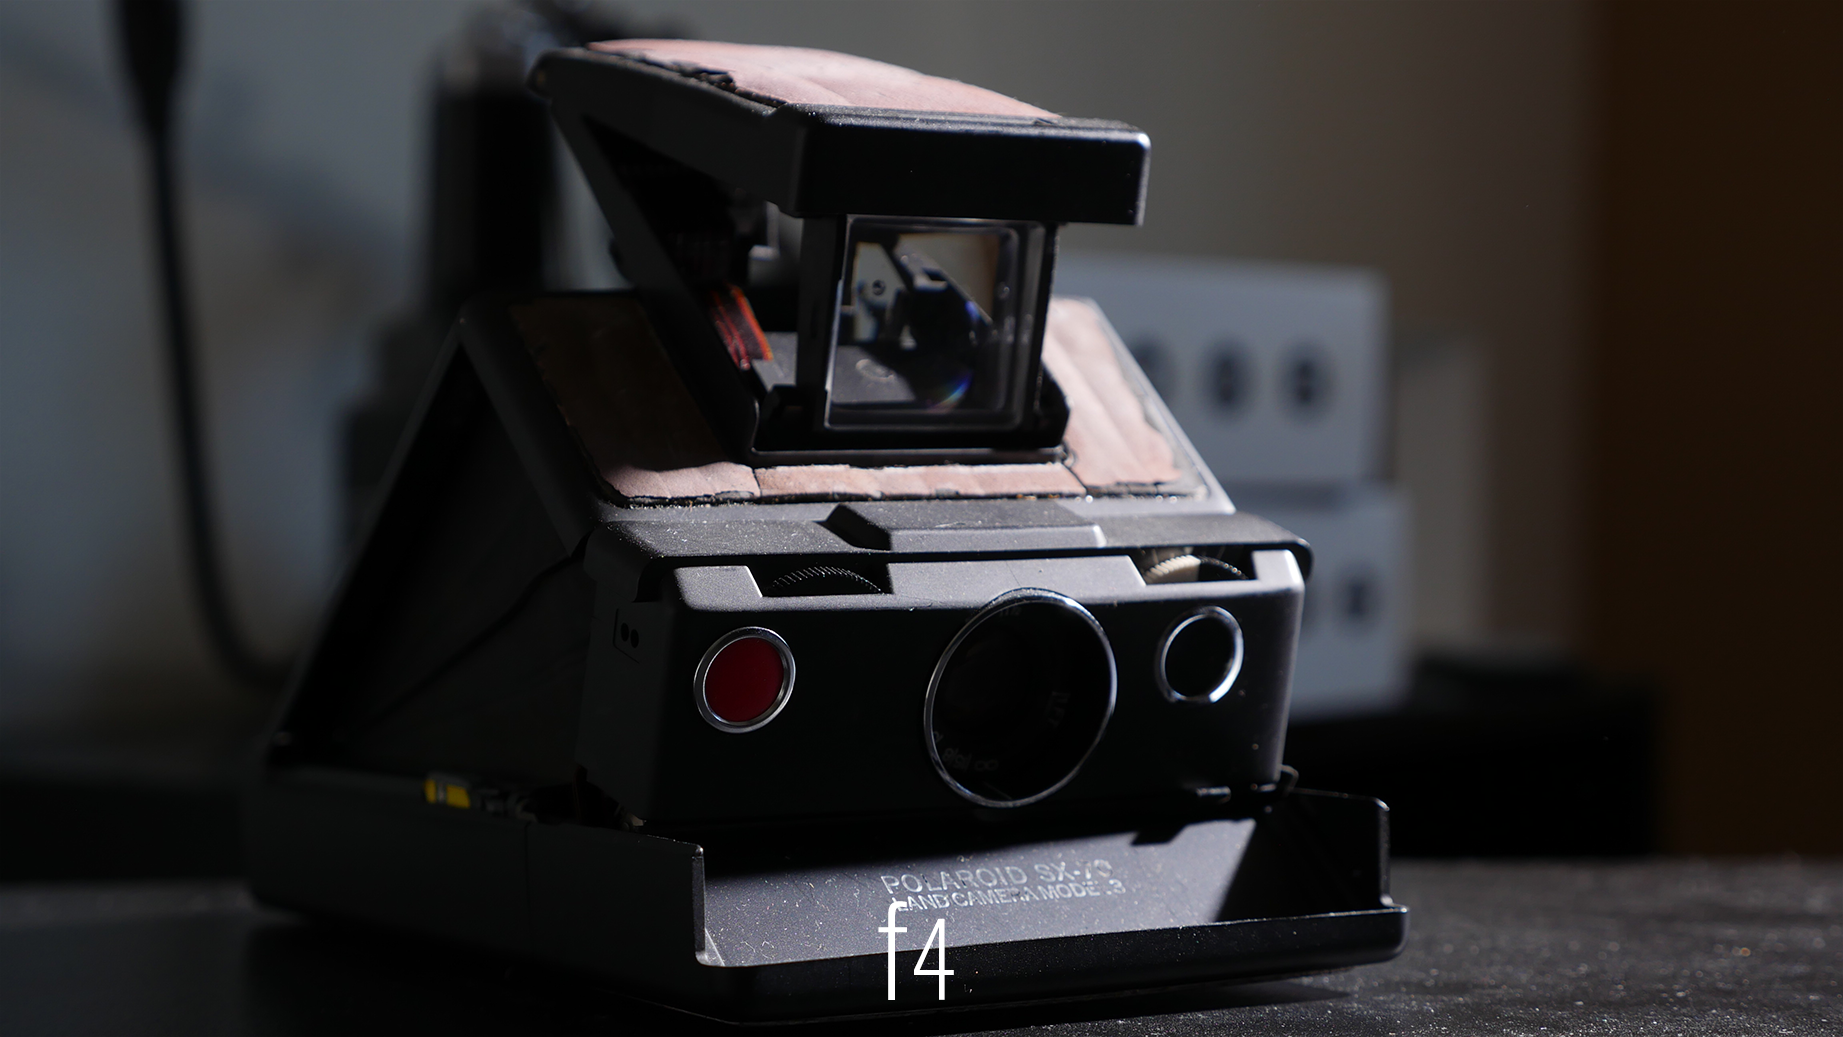
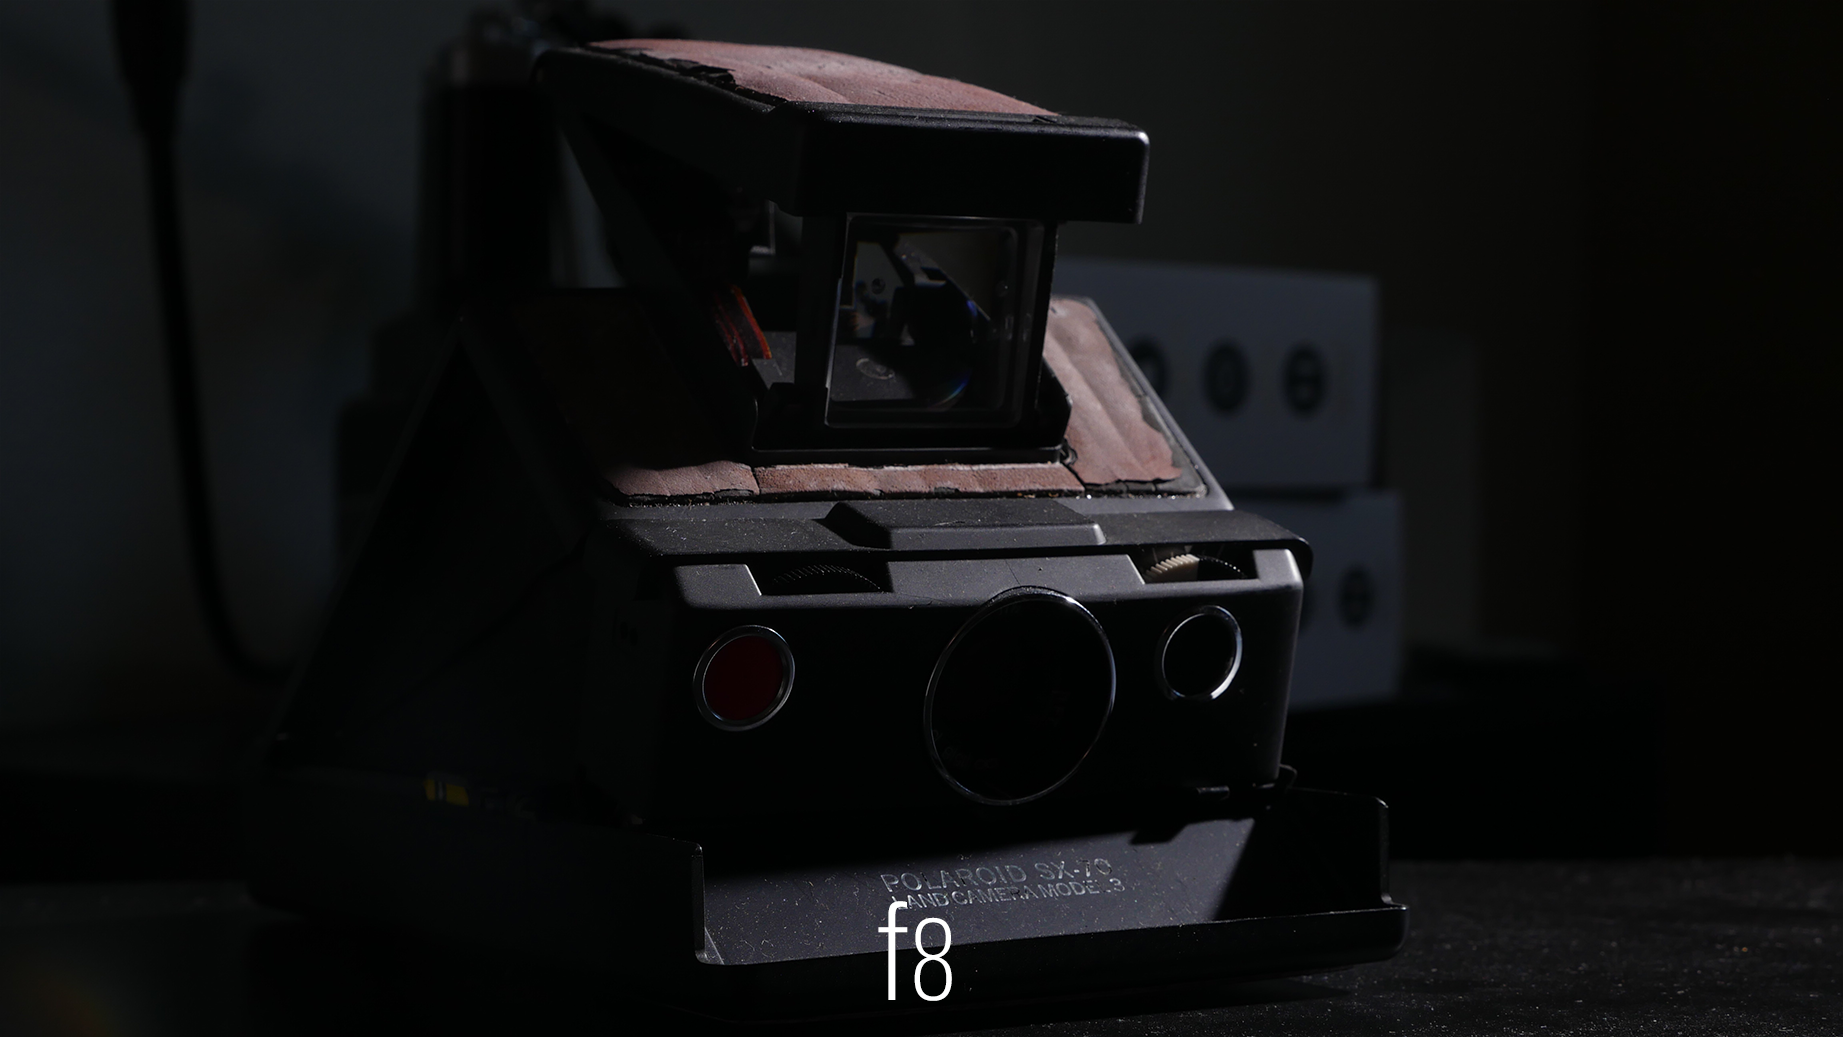
What is a F-Stop?
A f-stop is a number used to measure the amount of light passing through the aperture. Each f-stop has a very specific number attached to it. You may have seen these numbers before on your lens or in your camera settings. Together these numbers create the f-stop scale.
F-STOP SCALE
f1, f1.4, f2, f2.8, f4, f5.6, f8, f11, f16, f22, f32
How to read the F-Stop Scale
The larger the number on the f-stop scale the smaller the aperture, and therefore less light will enter the camera. The smaller the number on the f-stop scale the larger the aperture, and therefore more light will enter the camera.
These numbers can be difficult to memorize and seem completely random, but there is a method to the madness. To memorize the f-stop scale you only need to remember two numbers: f1 and f1.4. Let me prove it to you. If we repeatedly multiply f1 by 2 our solutions will consist of half of the f-stop scale: f1x2= f2, f2x2= f4, f4x2= f8, f8x2= f16, and finally f16x2= f32. Respectively, if we repeatedly multiply f1.4 by 2 our solutions will consist of the remaining half of the f-stop scale: f1.4x2= f2.8, f2.8x2= f5.6, f5.6x2= f11 (this value is rounded down from 11.2), and f11x2= f22.
How does a F-Stop affect the Image?
Each stop on the f-stop scale doubles or halves the amount of light in the image. f1.4 has twice (x2) the amount of light as f2 and four times (x4) the amount of light as f2.8. This also works backwards. F8 is twice as dark as f5.6 and four times as dark as f4.

F-Stops vs Depth of Field
F-stops not only control light but also control depth of field. Depth of field is the amount of 3D space in an image that is in focus. If we think of a graph we have our x-axis (left and right), our y-axis (up and down), and our z-axis (forward and backward). Depth of field deals with z space. The larger the number on the f-stop scale the more depth of field and the smaller the number the less depth of field.
You may have heard that the “cinematic look” includes having a shallow depth of field. This means that the f-stop number is small and there is only a small amount of space that is in focus in an image. Images with a shallow depth of field would have the subject in focus and the background out of focus.

If an image has a large amount of depth of field then it means that the f-stop number is big and a larger amount of space is in focus in an image. Images with a large depth of field would have the subject in focus and the background in focus too.

The Exposure Triangle
What is the Exposure Triangle?
The exposure triangle is a guide to understand the relationship between ISO, aperture, and shutter speed. Each setting represents one corner of the triangle. Since all three of these settings affect the amount of light processed by the camera in their own unique way, each are important when dialing in your perfect exposure. Think of it as a give and take: if you add brightness by raising the ISO one stop, in order to keep the same exposure the brightness in either the aperture or shutter speed will need to be decreased one stop.
Below are 3 examples displaying the relationship of the exposure triangle. All three of these examples have the same exposure only with different settings.
ISO 400 1/50 F4 = ISO 400 1/100 F2.8
ISO 800 1/400 F5.6 = ISO 200 1/100 F5.6
ISO 200 1/200 F2 = ISO 800 1/50 F8
In the first example, I went down a stop using my shutter speed (1/50 -> 1/100). I gained a stop back using f-stops (f4 -> f2.8). I subtracted some depth of field from my image.
In the second example, I went down 2 stops using my ISO (800 -> 200). I gained 2 stops with my shutter speed (1/400 -> 1/100). I added more motion blur into my image.
In the third example I went up 2 stops using my ISO (200 -> 800). I gained another 2 stops with my shutter speed. I lost 4 stops with my f-stops (f2 -> f8). I subtracted depth of field from my image.
Crazy right? In photography all three corners of the exposure triangle can constantly be manipulated. However, film is much more limiting. If I want to shoot an indoor scene at ISO 800 1/48 f2 exactly I will need outside sources in order to craft the perfect image. This is where studio lighting comes in. Using external lights can help cinematographers get the look they want at the settings they want.
The Sunny 16 Rule
What is the Sunny 16 Rule?
The Sunny 16 rule is a benchmark for exposure. The rule states that on a sunny day if your camera’s ISO and shutter speed denominator equal the same number the aperture will be an f16. So ISO 100 1/100 F16 is theoretically the perfect exposure on a normal sunny day.
Remember that this rule is a benchmark and is not always perfect but it gets you pretty close. My favorite way to use this rule is as a starting point for manipulating the exposure triangle. If I know that ISO 100, 1/100, F16 is close to the correct exposure, I now can use the exposure triangle to find the right settings for a photo at any other combination of my desired settings.
For example, I set off during mid day to take a portrait of a friend. To get a benchmark for my exposure I dial in my settings at ISO 800 1/800 f16. The picture is fairly close to the right amount of light I need. But there is way too much depth of field especially since this is supposed to by a portrait. From there I remember the exposure triangle and how I can change my settings to get my desired look without changing the amount of light in the image. I gain 5 stops from opening my aperture from f16 to f2.8. I then take two stops away by lowering my ISO from 800 to 200 and then take 3 stops away by changing my shutter speed from 1/800 to 1/6400. Now I have the same amount of light but with a shallow depth of field.
I hope you enjoyed Jump Start to Exposure and are ready to start exposing your own images! If you got value from this guide please share it and subscribe to the newsletter for more in-depth filmmaking guides! Have any questions? Comment below!